Convert AVCHD, MTS and M2TS files to MP4, AVI, MOV... on Windows and Mac.

Many people now usually use a video camera for high-quality filming as a leisure activity. Then, appealing videos are expected to share with family or friends. Before YouTube came out, the only way to view videos was your TV or computer. But a funny thing happened to camcorders: the Internet. YouTube becomes one of the most popular video sites on the Web today. Millions of videos have been uploaded and shared here, ranging from movie trailers to amateur videos of cats- and everything in between. Feel like sharing your nice videos shot with HD camcorders with the world? YouTube has made efforts to make sure that the uploading process is as intuitive as possible. But the key issue lies that video footage of an HD camcorder is usually AVCHD format file which is not supported by YouTube for uploading.
Don’t panic. You are in the right place.
This post will show you the best solution to transfer Camcorder AVCHD to YouTube.
Part1: Connect Camcorder to Computer
It’s a good idea to transfer that video to your computer hard- drive. Typically, the easiest way to transfer video from a camcorder to a computer is to connect them via a USB cable and use the software that came with your camcorder to perform the transfer.
1: Turn your computer on
It will use a lot of system resources while transferring your video from a camcorder. Therefore, you'd better close other running programs before transfer videos to your computer.
2: Connect the cable to your camera
Typically, the port on your camera will fit the mini USB end of the cable. You may have to open a small panel on the digital camera body or even remove the camera battery to uncover the port.
3: Connect the cable to your computer
The other end of your USB cable will connect to one of the USB ports on your computer. On desktop computers, you’ll find USB ports on the front or back of the computer tower; laptops usually feature them on either side of the computer. Now your camcorder will be automatically detected and will appear as a hard disk drive on computer.
Tip: If your camera doesn’t have a USB port, refer to the manual for your camcorder to see what type of connection you will need to transfer camcorder video.
Part2: Transfer Video from Camcorder to Computer
After the camcorder has connected to your computer, you could transfer videos from camcorder to computer with ease, just like copying files from one disk drive to another.
But if you want to play them, one thing you should know is that most popular media player cannot support HD camcorder videos in AVCHD file format (.mts/ .m2ts file extension). That is to say, you can easily transfer videos from camcorder to computer, but it’s hard to play them. Don’t worry. In just four steps, I’ll show you the easiest way to play camcorder videos on a PC.
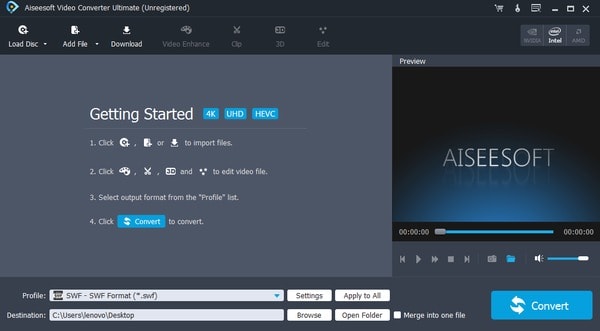
Step 1: Run AVCHD Video Converter
Free download, install and launch an easy-to-use video converter tool. f2fsoft AVCHD Video Converter is taken as an example in this article.
Convert AVCHD, MTS and M2TS files to MP4, AVI, MOV... on Windows and Mac.
Step 2: Add source file
Press Add File to add source AVCHD video file. You can simultaneously add several videos as you want.

Step 3: Choose output format and destination
Select a Windows or Mac supported file format in the drop-down list of Profile as output format. MP4 is the best choice.

Press Convert to start converting AVCHD to MP4. A few minutes later, you can find and play it in the output folder.
Tips:
1. With Merge function, you can choose to Merge into one file to convert several files into one for convenience.
2. f2fsoft AVCHD Video Converter provides various video and audio editing functions. For video, you can make detailed settings such as video encoder, resolution, frame rate, video bitrate. For audio, you are supposed to set the audio encoder, sample rate, channels, audio bitrate.
Part3: Upload Camcorder Videos in AVCHD to YouTube
One thing may confuse you: “Is AVCHD supported by YouTube?” Well, I have to tell you that AVCHD is not among the recommended file types for uploading by YouTube. So you’d better convert the videos to a YouTube friendly format, such as MP4, FLV, AVI, WMV, etc.
f2fsoft AVCHD Video Converter enables you to convert AVCHD footage to HD MP4, HD AVI, HD MOV, etc. for losing no quality. You can also use the software to convert AVCHD videos for playback on hot devices, like iPhone, iPad, Apple TV, and so on. You could turn to Part2 for the step-by-step guide.
After the conversion, you can upload videos to YouTube in a few easy steps.
1. Sign in to YouTube.
2. At the top of the page, click the Upload icon and select Upload video.
3. Select the video you want to upload from the output folder.
4. As the video is uploading, you can do some settings for the video.
5. Click Publish to finish uploading your videos to YouTube. You’re allowed to share your videos by clicking Share button.
Convert AVCHD, MTS and M2TS files to MP4, AVI, MOV... on Windows and Mac.
You May Also Like to Read:
- How to Convert MTS to MP4 with AVCHD Video Converter
- How to Convert M2TS to MKV with AVCHD Video Converter
- [Answered] Can PS4 Play MP4 File?-f2fsoft MP4 Video Converter
- How to Import Videos from Sony Handycam to Mac iMovie for Editing
- How to Convert AVCHD to MOV Fast and without Quality Loss
- How to Transfer Videos from Canon Camcorder to Computer
