Create, Convert or Burn any DVD to Blu-ray Disc, folders and ISO Image files, and photos to Bluray slideshow easily on Windows and Mac.
“ Hello, my boyfriend’s birthday is coming; it is also our second anniversary. So I want to make a video with music and pictures which record our life as his birthday gift. But I’m green fingers on video making. Is there any suitable picture video maker for beginners? ”
Tom
I guess a lot of people are bothering about selecting gifts for family members or friends. Suppose that you don’t have a better idea, it is great to create a video for them. As a Chinese saying goes that the gift is trifling but the feeling is profound, the emotional conveyance is the most important. Actually, video creation is not so difficult with photo DVD maker. The tutorial next will show you steps on burning photos to DVD disc with a photo slideshow maker.
Part1: f2fsoft Blu-ray Creator- A professional Picture Video Maker
f2fsoft Blu-ray Creator is a multi-functional program with conversion, edition, and burning. It supports to convert all format videos or pictures to Blu-ray/DVD/ISO Image files, which you can refer to how to burn video to DVD on Windows and how to burn FLV to Blu-ray disc. For the protection of copyright, you could add watermark in the edit of the output video. For better watching experience, you could add 3D effect to convert 2D to 3D movies. What’s more, you could customize a disc menu with background image and music as you like.
Part2: How to Burn Photos to DVD
Step 1: Download, install and run picture video maker-f2fsoft Blu-ray Creator on your computer
Four panels are displayed on the top of the main page. Simply click the Add Photo button to open the browser window, find the image files and import them into this picture video maker, you can drag /drop the photos to organize them on the storyboard.

Note: Before production of a photo slideshow, please prepare for a blank and writable DVD disc.
Create, Convert or Burn any DVD to Blu-ray Disc, folders and ISO Image files, and photos to Bluray slideshow easily on Windows and Mac.
Step2: Customize photo slideshow transition and add background music
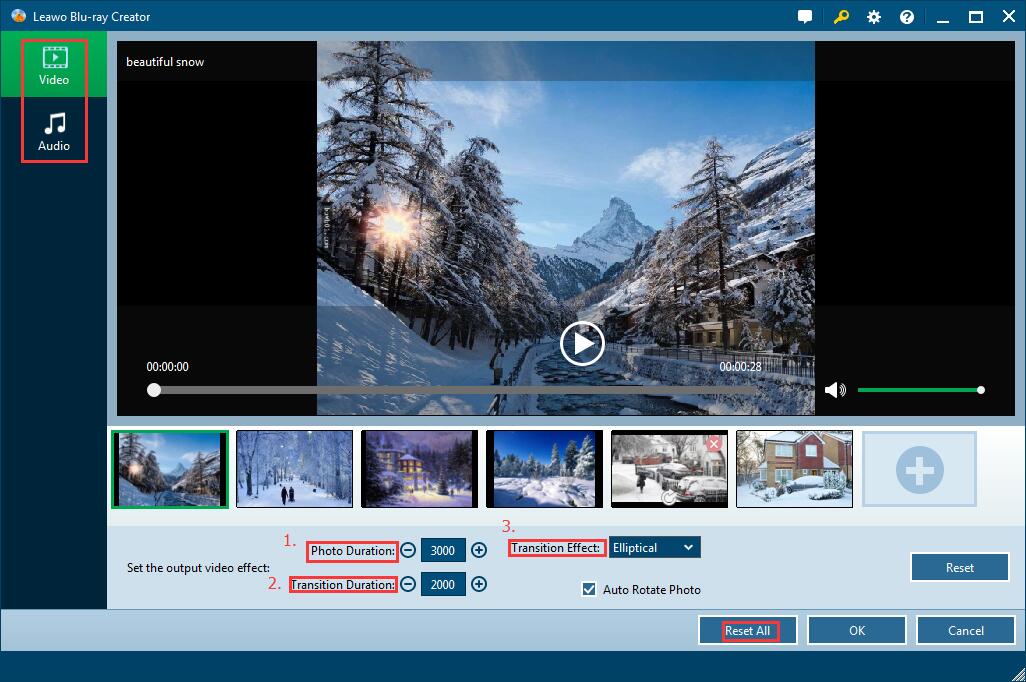
Generally speaking, transition effect will be automatically inserted between every two photos as you import the photos. But you can customize them according to your preference and add background music for the slideshow.
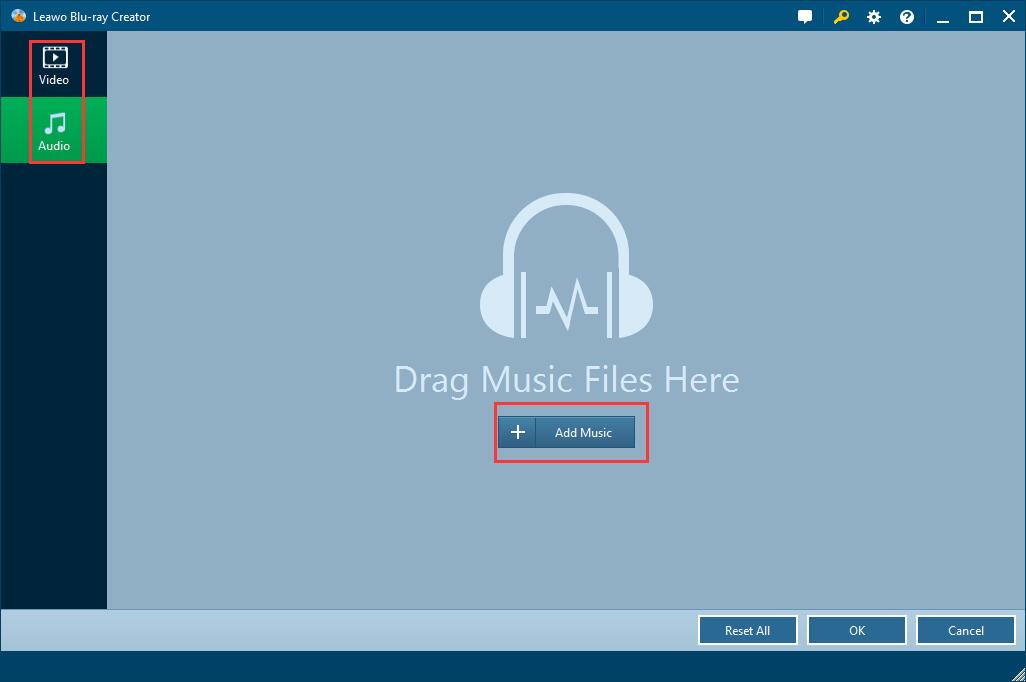
Right-click for choosing Edit selection or directly click the edit icon. There are two function buttons on the left sidebar. To set the output video effect including photo duration, transition duration, and transition effect by clicking the Video button. If you want to apply the section to all photos, just tick Reset All and then click the OK button. Next, import audios for the background music, select the output audio effect and then click the OK button.


Step 3: Select a DVD disc menu
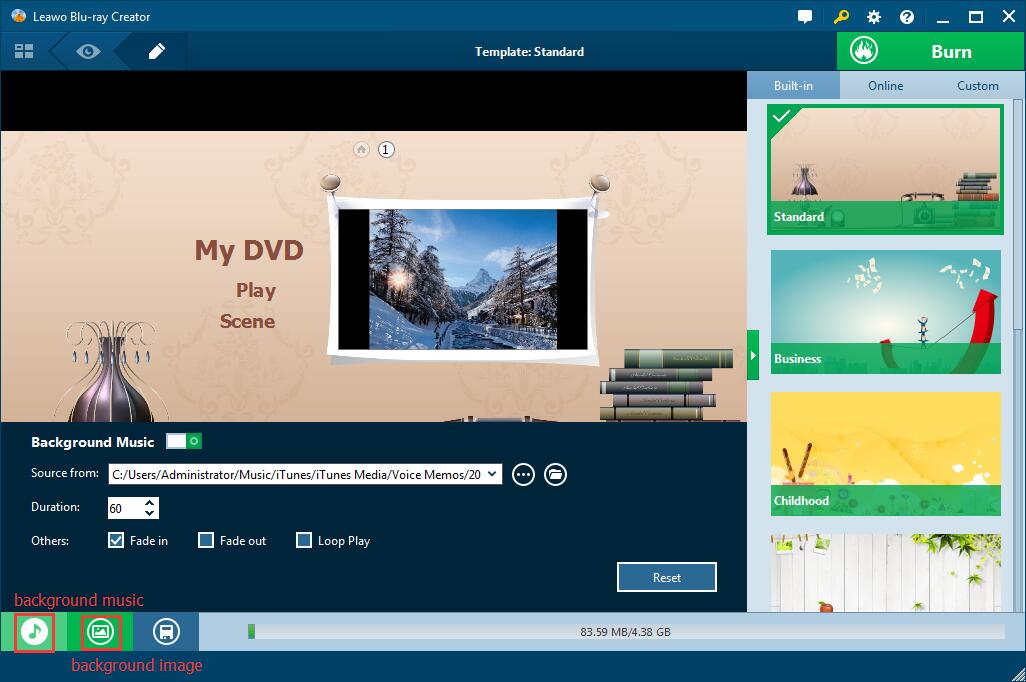
Now choose one template as disc menu from the right sidebar. Click the Eye icon in the middle of the template to have an instant preview, making sure the photo DVD slideshow is exactly what you want. You can also add background image and music for disc menu by clicking the Edit icon behind the eye icon.


Step 4: Burn photos to DVD
Insert a blank and writable DVD disc to your computer, and do the following.
1. Select the DVD type, bit rate and aspect ratio of the output photo slideshow. Make sure the DVD type is consistent with the dis you have inserted. Normally, DVD-5 can store a 100 minutes long movie and DVD-9 can store a 230 minutes long movie.
2. Click the wheel icon on the top right corner, finish default video mode from Burn option and then click OK button. Please make sure the PAL or NTSC TV Standard setting is right. The wrong TV standard would give rise to playback incompatibility.
3. Click the Burn button which turns green after importing of photo files and finish the disc label and the location saving the output movie file. You can also choose to generate ISO Image files or DVD folders which will be created to the specified folder.

4. Finally, click the flame icon start burning the slideshow to disc. You can enjoy the video you created with DVD converter as the burning complete.

Create, Convert or Burn any DVD to Blu-ray Disc, folders and ISO Image files, and photos to Bluray slideshow easily on Windows and Mac.
You May Also Like to Read:
- How to Do MKV File to DVD Creation on Windows
- How to Do FLV to Blu Ray Disc Creation with Blu Ray Creator
- How to Completely Create DVD to Blu ray Disc on Windows
- How to Create Any DVD to Blu ray Disc on Mac
- How to Burn Video to DVD on Windows
- The Best Way to Burn MP4 to DVD
- Best Windows DVD Maker- How to Make a DVD on Windows
