Burn iMovie Videos to DVD, Create DVD from any Videos on Mac.
In this time of resource sharing, we can search a lot of wonderful movies and videos on the internet. In our daily life, we also recode funny things with electronic productions like mobile, iPad, and camera. If you are interested in video production, these videos and movies will be source of material for you. Every video you edited records your growth in video production. So how do you save these videos? Store them on the hard drive on the PC? Upload to cloud account? Or burn to DVD discs? All of these are suitable to save the videos or movies. OK, today the tutorial tells you how to create DVD menu for the disc and then burn video to DVD/ISO.
Part1: What f2fsoft DVD Creator can do for you
To create DVD menu, a DVD menu creator is needed. Luckily, general DVD creators support to customize a disc menu. The creator applied in following article is f2fsoft DVD Creator. So why do I choose f2fsoft? Find the answer below.
a. Burn video to DVD/ISO folder from all popular formats: convert AVCHD to DVD,or burn YouTube to DVD.
b. Make photo slideshow from JPEG, PNG, BMP, GIF, TIFF, etc.
c. Built-in video editor to enhance video, trim video length, crop the frame, and add watermark.
d. Add subtitles to video in SSA, ASS, SRT, and SUB format.
e. Create static and dynamic DVD menu. Personalize the background music and image by using your favorite song and picture.
Don't miss:
Burn iMovie Videos to DVD, Create DVD from any Videos on Mac.
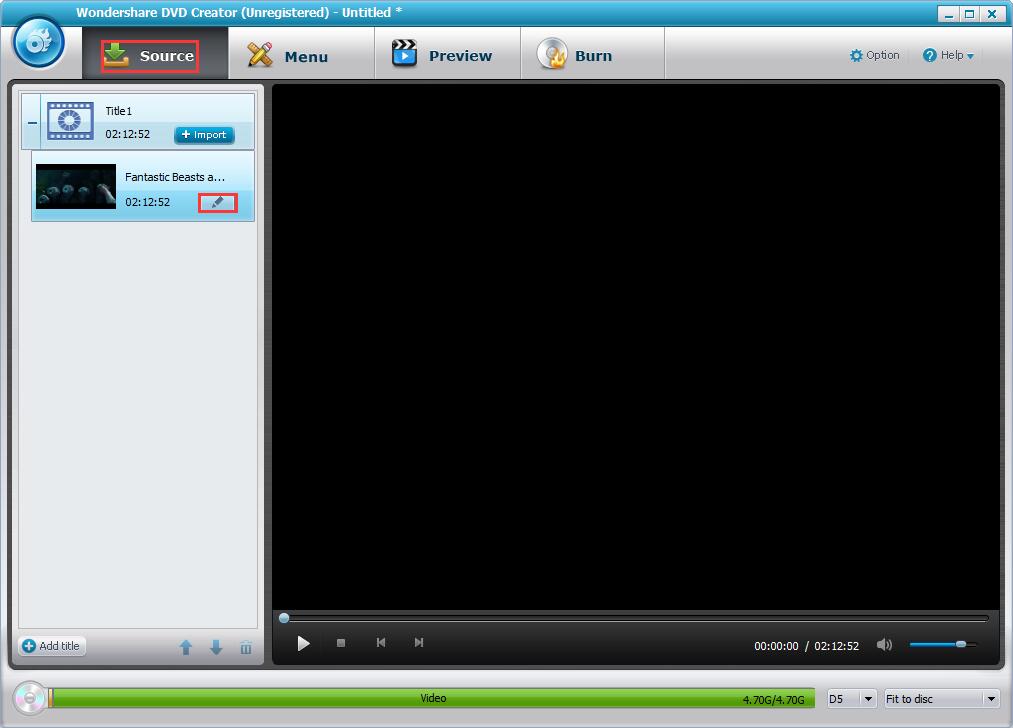
Hit the + Import button on Source tab to add the videos from local PC. All loaded videos will be showed as a thumbnail on the left. You could preview the videos through the playback windows on the interface.

After the loading, pitch on the pencil-like icon on thumbnail coming to Video Edit windows. Of course, this operation is optional, just skip if you have no needs on enhance the video like trimming the video length, adding watermark or subtitle. Remember to hit OK icon to save the adjustments.

Step2: create DVD menu for video to DVD conversion
Move to Menu tab to create DVD menu for the disc. On the left is menu structure from which you can clearly know the contents of this disc.
1. Design the main menu. Pick one template from right and double click to apply it. Hit the green arrowhead to download more online. Change the background image and music by clicking corresponding icons at the bottom. Adjust the color and location of the text after changing the image.


2. Move to title page. Change the background music & image, and text according to the steps mentioned above. Pitch on the fourth and fifth icon to customize the thumbnail and create new chapter.

3. Adorn the chapter page in the way mentioned and then the work of creating a disc menu has done.
Step3: preview and burn video to DVD/ISO
Preview disc
Preventing some steps ignored, move to Preview tab to check the menu and video you have edited. Supposing further editions are required, go back to make changes.

Burn video to DVD/ISO
1. Find the Optional button on the upper right corner. Select the TV Standard: PAL and NTSC. Not sure which one you should stick? Find the answer in Help block.
2. Insert one writable disc into the disc driver on the PC. Pick the disc type (D5/D9) and bit rate (Standard, Fit to disc, and High Quality).
3. Choose the folder path of where to save ISO file, name the disc label, tick Burn to disc and/or Save as ISO, and finally click the blue Burn starting conversion work.


Note: A watermark will be displayed on the output video in trial version, so you need to purchase the program to remove it.
Burn iMovie Videos to DVD, Create DVD from any Videos on Mac.
You May Also Like to Read:
- [Simple Steps] Show you How to Burn iMovie to DVD on Mac
- HD DVD Burner: Burn HD Video to DVD in Less Quality Loss
- [Easy] Add Watermark to Video for Copyright Protection
- How to Create Any DVD to Blu ray Disc on Mac
- How to Burn Video to DVD on Windows
- The Best Way to Burn MP4 to DVD
- How to Make a Video with Photos and Music with DVD Creator
