Burn iMovie Videos to DVD, Create DVD from any Videos on Mac.
“ Hello, my idol has a new movie. Except to go to the cinema to support him, I want to make a promotional video about my idol, so that people who don’t know him can learn more about him. I’m not skilled in computer operations. And I just need to add pictures, background music, and text. ”
Tom

When it comes to video edition, most people choose to download a professional video editor, which may be a little difficult for a novice. Most people know that DVD creator is used to burning discs. Actually, it has another function that simply editing the video to be burned. And in this article, you will get how to make a video with photos and music with DVD Creator.
Don't miss Steps to Burn 4k Films to Blu-ray Disc for Playback on TV.Part1:How to Make a Video with Photos and Music
Some words before converting picture to video: The following method is suitable for novices, insomuch someone skilled in video edition may need higher level tutorials. What’s more, providing that you wish to burn the videos to DVD for storage or playback, a blank and writable DVD is needed. If your pc couldn’t read DVD, one external DVD driver is required as well. Ok, let’s start our work!
Step1: Launch f2fsoft DVD Creator on the computer
Firstly, download the f2fsoft DVD Creator and install it as the guidance from the authorized website.
Burn iMovie Videos to DVD, Create DVD from any Videos on Mac.
Step2: Add the source pictures or videos
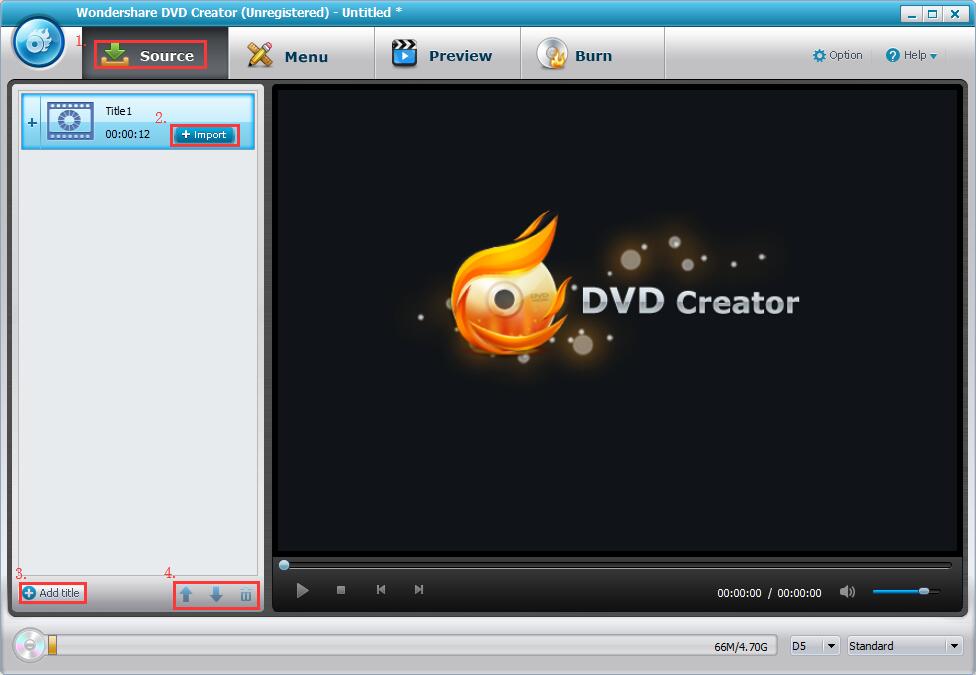
Click on the “+ import” button on the Source tab to add the pictures and photos you wish to convert to video. The loaded picture will be displayed as a thumbnail on the left side. Click the Add title button at the left-bottom to add new title pages. Right click to move up/down to change the order of the pictures.

Step3: Add background music for the video
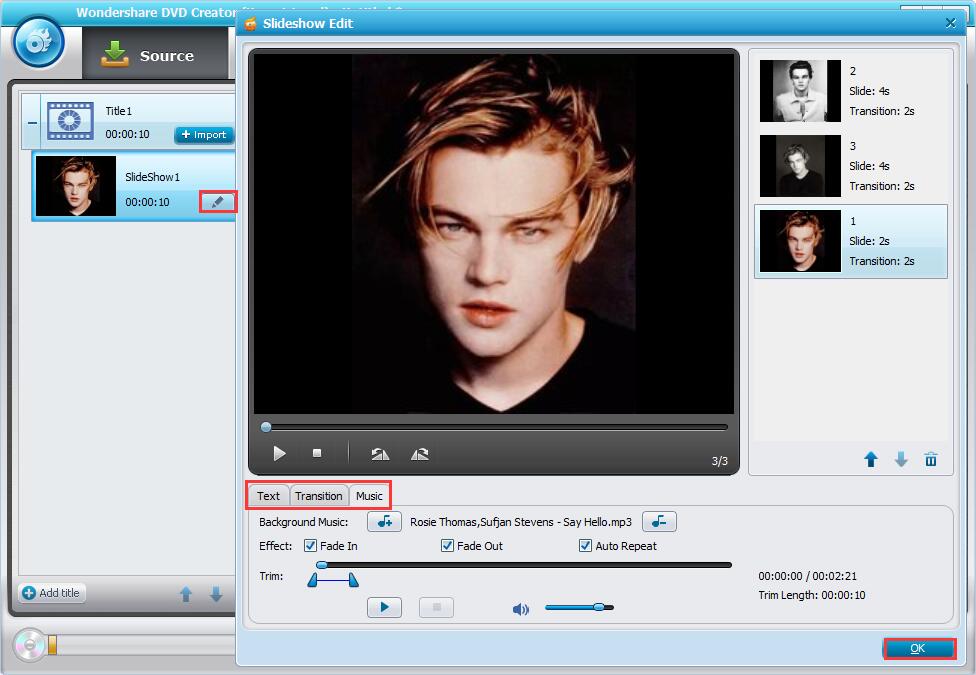
By hitting the pencil-like icon on the thumbnail, one Video Edit windows will show up. Click the Music button to add background music. Trim the unwanted part according to the length of the video. You could typewrite sentences and reset the transition of the pictures.

Step4: Create DVD Menu
Move to Menu tab; create one disc cover if you wish to play this video on a bigger screen. Select one template from the right side, and double click to apply it. By clicking respective icons at the bottom to change background pictures and music, add text, or create chapters.
More details are in Learn to Create DVD Menu in your Style

Step5: Preview video
After making all these changes, entering into the Preview tab to check the changes you have made. Just go back to make further adjustments if needed.

Step6: Burn video to DVD or ISO
Want to convert this video to DVD for storage or playback?
1. Insert the disc you have prepared. If your PC is unable to extract DVD, install the disc into the DVD drive and connect it to the PC via USB cable.
2. Select the right disc type which is consistent with the one you have installed and video quality according to your demand.
3. Find the Option menu to choose the TV Standard.
4. At last, name the disc label, tick Burn to disc or Save as ISO and then hit the blue Burn button to convert edited video to DVD.

Part2:Tips for converting pictures to video
1. Be conscientious when selecting the TV standard, there are mainly three TV systems in the world, they are incompatible, which means a PAL standard DVD can’t be played on NTSC standard TV.
2. You can edit each photo first and then put them into one chapter.
3. It is better to import high definition pictures for better playback effect.
4. Please make sure that the capacity of the disc you have installed is enough. Normally, one DVD-9 (7.9G) can store about a video with 100 minutes and DVD-5 (4.3G) can store about a video with 240 minutes.
The steps above are easy to understand and operate, right? f2fsoft DVD Creator also can help you burn all format videos like MP4, MKV, iMovie, VOB, MTS to DVD. Suppose that you want to add 3D effect, you can read How to Burn 2D to 3D on PC.
Burn iMovie Videos to DVD, Create DVD from any Videos on Mac.
You May Also Like to Read:
- How to Do MKV File to DVD Creation on Windows
- How to Do FLV to Blu Ray Disc Creation with Blu Ray Creator
- How to Completely Create DVD to Blu ray Disc on Windows
- How to Create Any DVD to Blu ray Disc on Mac
- How to Burn Video to DVD on Windows
- The Best Way to Burn MP4 to DVD
- Best Windows DVD Maker- How to Make a DVD on Windows
